Let’s get one problem at a time out of the way this year. What problem do you think I am referring too?
Theme? Coverage? Content? Clubs?
No – I am referring to the one issue that more often than not affects our sales and that is the portrait section. If your photo is not in the people section why on Earth are you going to buy the book right?
So during my first week of school I had a plan. We are going to teach the entire student body how to take wonderful mugshots and have them submit them. Sound great.
Nope.
When I tried to get my own media staff to do this, they did not do so well. At this point, I decided we needed to take the portraits ourselves because under the COVID-19 guidelines outside vendors are not allowed into the building. Here is how we did it without a professional company and with student photographers.
My first concern was for the safety of my staff and our students. I wanted to do it in a space that was safe for both our in-person kids and our virtual students. We decided to set up spots outside under our bus loop awning. Students would walk outside from their classes on Thursday, the in-person photo day, and drive up on Friday, the virtual day. I will explain how both went after I mention our equipment.
I needed to make sure that we had enough equipment (I am not endorsing any particular products – these just fit our needs). I ordered a few more Nifty 50 lenses so that I had four of the same kind of lenses. We used Canon cameras (see below for more specifics and cost).
Next, I wanted to have backdrops that would be easy to store once we were done and that were also affordable. We purchased four collapsible 5X5 backdrops that had blue/grey reversible sides. They attached with simple clips I bought from the hardware store on tripods that were light stands.
The last concern was consistent light. I already had a few speedlite external flashes, so I only had to get softboxes. However I also wanted to make them able to move away from the camera so I bought four remote triggers for the flashes. Trust me these will pay for themselves in the years to come.
I know this sounds like a lot of money, but I promise you if you have four cameras and four tripods that is most of the expense already taken care of.
On the week of the photo shoot, I took my classes outside to practice several times and we even made a video explaining to the rest of the school how it would be done.
Here is the link to the video: https://vimeo.com/461081634
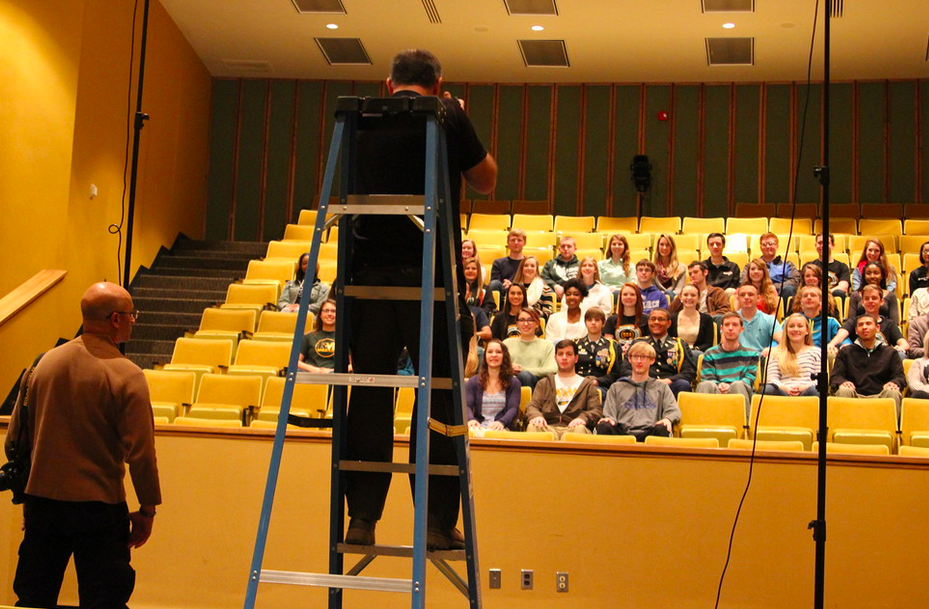
On the day of the photoshoot, we had four stations with three people at each station: a photographer, a slate writer, and a photo assistant. In total we needed 12 people working the event.
Students approached the slate writer and told them their name. The slate writer wrote down their name and camera letter and gave them the sheet. The student sat down in front of the backdrop held up their slate for the first photo. They disposed of the slate into a box and took off their mask. The photographer told them to place both feet on an “x” marked on one side and took two photos. The photographer then told them to put their feet on the “x” marked on the other side and took two more photos.
The assistant made sure that the backdrop stayed steady and that the flash was firing.
We saved all of the photos from the four SD cards on an external hard drive. We then went through the eight folders, four for in person students, four for virtual students, and used Adobe Bridge and Photoshop to rename them and crop them. We then uploaded them to EDesign and SmugMug. Our parents will be able to search on our SmugMug account to purchase them and they are kept private with the use of their student ID number as their password.
That’s it. I thought I always wanted to try this and this is the year that if it fails who cares?
Here are the payoffs. Your kids are shooting the portraits. Your kids are shooting the portraits. Your kids are shooting the portraits.
Before this has always been the section that the staff was only marginally proud of. Now they can’t wait to see it all together.
When we asked our staff how they felt it went, they said they think that our students were much happier because they knew we cared about them having a good photo. Usually the professional company has to rush them through, and the students didn’t feel that with our staff photographers there.
I learned a couple of other things. A rainy day, as long as it doesn’t get your equipment wet, is a great external lighting day. And portrait photography is one of the best ways to get a shy photographer to come out of her shell. The student cannot do this job if she does not speak to the subject.
The payoffs were immense. The stress was good. The students felt very proud.
Here is a list of equipment and costs for one setup.
Required:
Backdrop: Kate 5X5 Collapsable Backdrop ($89)
Stand: Impact Light Stand 6’ ($19.99)
Only Other Things Required But You Probably Have:
Camera: Canon T7 ($449) – We used our old T5i and 70D cameras
Lens: Canon EF 50 mm F1.8 ($125) Yongnuo YN50mm F1.8 ($59) – Yongnuo worked fine.
Camera Tripod: This doesn’t really matter but you need a tripod. You can use a $29 or a $290.
Things That Would Be Nice To Have:
Light: Yongnuo Speedlite YN600EX-RT II for Canon Cameras ($138)
Softbox: Angler BoomBox for Shoe-Mount Flashes 26″ ($59)
Remote Flash: Vello FreeWave Mini-Stand Flash Trigger Set ($24.95)